


A rain barrel at your home will conserve water and reduce the amount of stormwater runoff that carries pollutants to streams. Reusing food grade containers also removes materials from the waste stream. You can put yours together for about $30.
Tips for using your rain barrel
-
- Do not use collected water for drinking, cooking or bathing.
- Keep lid secure so children or animals cannot fall in.
- Disconnect barrel to avoid constant overflow during rainiest months. Attach for use in early spring.
- If a moss killer has been used on the roof, wait couple of rainfall events before collecting runoff.
- Elevate your rain barrel slightly to make access to the spigot easier.
- The screened louver vent will prevent mosquitoes from breeding in your barrel.
Consider joining multiple barrels for additional capacity!
Step 1
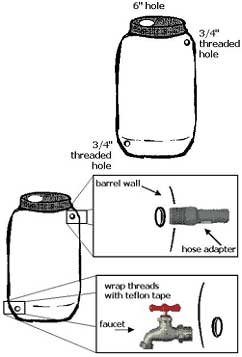
- Use a 6″ hole saw, a saber saw, a keyhole saw or a drywall saw to cut a perfectly round 6” hole on the top of your barrel.
- Drill two holes with a 29/32” drill bit, one towards the top for an overflow and one towards the bottom of the barrel for the faucet.
- Next use a 3/4″ NPT pipe tap and twist it into the upper 29/32″ hole, then untwist the tap and back it out of the hole, then repeat the same process for the lower 29/32″ hole.
- Rinse barrel out thoroughly- it previously had a food product in it.
Step 2
- Twist threaded side of hose adapter into 3/4″ threaded hole towards top of the barrel.
- Prepare threaded side of brass faucet; wrap tightly with teflon tape, make 4 or 5 rotations until all threads are covered; or apply a thin ribbon of Kitchen and Bath All Purpose Adhesive Caulk, or similar sealant.
- Twist the threaded, prepared end of the faucet into 3/4″ threaded hole at bottom of barrel.
Step 3
- Cover 6″ hole in the top by placing 6″ louvered screen onto the barrel with louvered side up and screen side down.

- Slide a hose onto hose adapter at top of barrel to direct overflow water away from your home.
- Place 2 concrete blocks under selected downspout as a raised base.
- Cut your downspout about 4″ above the top of the barrel, add an elbow, and make any final adjustments to the base and barrel.
- Add a hose on the faucet or keep it available to fill a watering can.
- Secure your rain barrel to the house with aluminum banding & screws.
- Enjoy your rainbarrel!

What You’ll Need:
- Drill •6″ Hole Saw •29/32″ Drill Bit •3/4″ Pipe Tap
- Louvered Screen •3/4″ Brass Faucet •Teflon Tape or All Purpose Caulk
- 3/4″ Hose Adapter •Plumbers Pipe Strap and Deck Screws